

The call came through on a Tuesday morning in late autumn, the kind of damp, grey day that makes every corroded ground connection act up. The voice on the other end was a maintenance supervisor from a regional refrigerated hauler running twelve nearly identical trucks. He had that exhausted, I’ve-tried-everything tone.
“We’ve thrown nine thousand eight hundred dollars in parts and labor at this fleet, and the damn CAN bus still drops out. I’ve got drivers pulling over thinking they’ve lost engine comms, ABS lights flickering, and my laptop full of ECU timeout faults. The dealer replaced two engine ECUs, three ABS modules, and a complete cab harness on one truck. The faults came back inside a week. On every single unit.”
After two decades crawling under dashboards and frame rails, I can diagnose the outline of a ground offset case from the first few words of a maintenance supervisor’s voicemail. But the price tag on this one still hit hard. Nine thousand eight hundred dollars. That wasn’t guesswork; he sent me the purchase orders. The culprit turned out to be a tiny DC voltage nobody had measured: a 0.3 volt ground offset between two nodes on the SAE J1939 backbone. That’s it. Three hundred millivolts. Less than a dying AA battery, enough to render a fleet’s diagnostics useless and send them firing new modules at a network problem that only needed a wire brush and a star washer. Later, I wrote a dedicated guide on ground offset ECU misdiagnosis precisely because this pattern keeps repeating across fleets.
The Scene When I Arrived
They ran a mixed fleet of 2021–2023 chassis with a common architecture: a single J1939 backbone spanning from the engine bay to a rear junction box, with body controller, ABS, transmission ECU, and a satellite tracking gateway hanging off drops. Fault codes were the usual suspects: J1939-7 timeouts, ABS communication lost, Engine ECU intermittent offline, Transmission TSC1 messages delayed. No single ECU appeared at fault, and the truck that had the full harness replacement still threw the same codes on its virgin wiring.
The technicians followed the standard playbook: checked terminating resistors (two 120 Ω resistors measured 60 Ω across the bus, textbook), scoped CAN_H and CAN_L at the diagnostic connector, saw nice square waves with correct recessive (2.5 V) and dominant levels (3.5 V / 1.5 V), and concluded the bus was healthy. Then they swapped ECUs. It’s the kind of diagnostic blind spot I’ve watched burn more fleet maintenance cash than a seized turbo — precisely because it hides behind textbook waveforms. I’ve seen a single unnecessary ECU replacement cost a fleet two thousand five hundred dollars in another case — a ground offset that never should have triggered a module swap.
What a 0.3 V Ground Offset Does to CAN Physically
CAN is differential, but every transceiver references its own local ground to determine the differential voltage. When ground potentials between two nodes differ, the common-mode voltage shifts. Picture two surveyors measuring from different zero points: a 0.3 V gap doesn’t sound like much, but it eats into the noise margin one microvolt at a time until the receiver can’t tell a recessive bit from a dominant one. This is a fundamental vulnerability built into the Controller Area Network physical layer — a system designed for noise immunity, yet exquisitely sensitive to any voltage gap between node grounds.
A typical J1939-11 compliant transceiver expects common-mode voltage to stay within –2 V to +7 V with respect to its local ground. The spec gives a generous berth, but in a well-bonded chassis system, the bus floats around 2.5 V common-mode. If Node A’s ground is 0.3 V higher than Node B’s, then a recessive bit sent by Node A arrives at Node B shifted upward by 0.3 V. Dominant differential might still be valid, but the recessive level creeps toward the transceiver’s receiver threshold. With long cable runs, slight ringing, and aging termination, bit errors start accumulating. The controller eventually hits its error-passive or bus-off threshold, and the ECU vanishes from the network. Meanwhile, the technician sees “ECU not responding” and blames the module. This is exactly why we always recommend measuring common-mode voltage shift with an oscilloscope — the differential view alone hides the offset completely.
On one truck I scoped the CAN_H and CAN_L simultaneously at the engine ECU and the ABS connector, each referenced to their own ground pins. The differential signal looked fine on both, but when I overlaid the two ground references, the 0.3 V DC shift became obvious. The ABS ECU was sitting on a ground pedestal that the engine ECU couldn’t see. Under heavy electrical load — headlamps, HVAC blower on high, trailer ABS power through the auxiliary circuit — the offset jumped to 0.42 V. Bus errors spiked exactly at those moments.
Step-by-Step: How I Tracked a 0.3 V Ground Offset to a Single Corroded Ground Stud
When you’re chasing an invisible ground, you don’t guess—you draw the circuit and you measure. If you need a deeper dive into the tools and methods for catching these silent network killers, our guide on how to diagnose J1939 ground offset issues walks through the full methodology.
1. Map the J1939 Backbone Physically
I drew a one-line diagram of the J1939 backbone from the engine ECU connector (Deutsch 9-pin) to the rear chassis connector, noting every inline splice and ground bond point. On these trucks, the shield drain terminated to chassis at the engine bulkhead and at the rear junction block. The backbone ground wire (pin C on the Deutsch 9-pin, per SAE J1939-11) was tied to chassis ground at the same two points.
2. Measure Ground Offset at Each Node with Engine Off, Ignition On
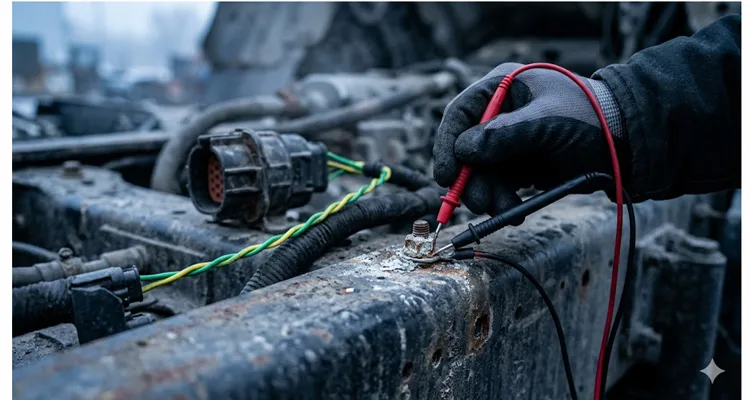
Using a Fluke 289 with relative mode, I measured DC voltage between the ground pins of the diagnostic connectors and a clean chassis reference (battery negative terminal). At the cabin diagnostic connector I read 0.02 V. At the engine ECU, 0.04 V. At the ABS ECU connector at the rear, 0.31 V. Bingo.
3. Load Test the Ground Path Under Full Electrical Load
With all electrical loads on (headlamps, blower, trailer marker lights), the offset at the ABS ECU rose to 0.42 V. I then measured voltage drop between the ABS ECU ground pin and the battery negative terminal under load: 0.39 V. Too much. SAE J1939-11 doesn’t explicitly mandate a drop limit, but good engineering practice keeps it under 0.1 V for digital signal returns.
4. Isolate the High-Resistance Chassis Ground Junction
I back-probed the backbone ground wire at each inline connector working backward from the ABS ECU. The drop vanished at the rear junction block’s chassis ground lug. A 10 mm stud with a ring terminal, buried under the frame rail, looked innocent. Removing the nut revealed a layer of white aluminium oxide so thick I could scrape it off with my thumbnail, exposing dull grey metal underneath. The factory had assembled it dry, and road salt had done its work. Resistance across that junction measured 12 Ω — not a dead open, just enough to float the local ground under current draw.
5. Repair, Verify, Then Monitor for Error Frames and Bus-Off Events
I cleaned the frame surface to bare steel, replaced the ring terminal with a tinned copper version, and re-torqued with a serrated flange nut and a star lock washer. Offset at the ABS ECU dropped to 0.02 V with all loads on. I then logged J1939 traffic for 24 hours with a Vector VN1610. Zero error frames, zero bus-off events, zero “ECU timeout” DTCs. The fleet manager called it “almost boring,” which is exactly what a CAN bus should be.
What This Fleet’s Technicians Got Wrong — and Why It’s Understandable
Looking back at the shop tickets, I saw the same pattern:
- They scoped CAN_H and CAN_L at the diagnostic connector—and saw clean differential squares. Nobody scoped the ground pin against the battery post. The fault was invisible to a single-ended measurement.
- When the rear ABS ECU kept timing out, they assumed a bad module. The replacement worked for three days because the act of disconnecting and re-seating the connector temporarily scraped through the oxide layer on the ground terminal.
- The new cab harness was installed but the frame ground studs were never re-surfaced. The fresh harness inherited the same corrosion resistance, so the offset didn’t budge.
- Every test was done with the engine idling and all loads off. The offset only broke through 0.4 V when the headlamps and blower ran together. A load test would have caught it in thirty seconds.
How to Confirm the Fix Is Real — J1939 Diagnostics Validation
After correcting the ground bond, do not rely on a five-minute key-on test. Clear all J1939-related DTCs, then operate the vehicle under real-world conditions — high vibration, wet roads, full electrical load — for at least an eight-hour shift. Log the bus with a CAN-to-USB interface and a script that counts error frames, NACKs, and timeouts. If the bus stays clean, you can close the job. For fleets that have never invested in bus-logging tools, I’ve outlined how a basic physical layer test setup saves hundreds of dollars in diagnostic fees — and pays for itself the first time you avoid an ECU swap.
I also recommend installing a permanent “health” gauge: a small OLED display showing the average bus-load percentage and error frame count, fed directly from a Raspberry Pi Pico with a CAN shield. It costs less than fifty dollars in parts and saves thousands in misdiagnosis.
Why the Cables Matter: What I Told the Fleet Afterwards
After fixing the ground, we discussed prevention. The existing backbone cables were commodity assemblies with untinned terminals and PVC jackets that hardened over time, allowing moisture ingress at the connector backshells. When you chase an intermittent ground offset every winter, the harness becomes the dominant failure mode.
After we isolated that 12 Ω oxide junction, I walked back into the factory with a question: How do we make sure a cable we ship never floats a ground reference by even fifty millivolts after five years of road salt?
We had the protocol in place already—over two decades of building J1939 harnesses forces a certain discipline—but we tightened one inspection step after a field return taught us exactly where the gap was. A backbone cable came back from a logging fleet with a 0.25 V offset that passed every standard continuity and hipot test. The root cause was a cold-welded terminal that measured 11 milliohms — invisible on a 1 A continuity check, but glaringly obvious once we pushed 10 A through it. That cable was “good” on paper, yet it floated the ABS ECU ground by a quarter volt on every bumpy haul road.
Now every backbone cable gets a milliohm-level ground-path test: a ten-amp pulse current from pin C (CAN signal ground) to the connector backshell, verified at less than five milliohms. That single number catches the kinds of dry terminal crimps, incomplete bonding, and micro-fretting damage that turn into 0.3 V offsets later.
Because the test runs at full assembly, we do it in a climate-controlled production cell—no terminal oxidation sneaking in before the overmold seals. The connectors are tin-plated copper with a RoHS-compliant finish, and the backshells are fully plastic to eliminate any accidental secondary return path. Every cable ships with that ground-offset value on its test report. This approach is backed by our IATF 16949 certification and an ISO 14001-registered production environment — not as sales badges, but as the framework that makes a five-milliohm ground-path test repeatable across thousands of harnesses.
For fleets, we offer OEM-level customization: you can specify logo, branding, length to the centimeter, jacket color, wire gauge (typically 18 AWG twisted pair for backbone runs up to forty meters), and connector keying. It means the harness that goes into your vehicle matches exactly what your engineering drawings call for, so no adapters, no splices, no extra ground paths added by a well-meaning mechanic.
Ground Integrity Pin Map — Forensic Data from the Faulty Truck
| Pin | Function | Measurement on the Faulty Truck (Engine-off) | After Repair | Diagnostic Note (ground offset focus) |
| C | CAN Signal Gnd | 0.31 V DC to battery negative (at ABS end) | 0.02 V | Dedicated return, bonded at ONE chassis point; offset >0.2 V here is root cause |
| H | Shield Drain | 0.28 V to battery negative (tied at both bulkhead & rear block) | <0.01 V (rear bond removed) | Shield must terminate at one end only; dual grounding created the ground loop that lifted both shield and signal ground |
| D | CAN_H | 3.2 V recessive at ABS (shifted) | 2.5 V | Recessive level drifts upward with ground offset; measures good differential, masks the problem |
| E | CAN_L | 1.8 V recessive at ABS (shifted) | 2.5 V | Same shift, differential checked out on scope, completely invisible until ground overlay |
| A | Power (+) | 12.4 V | 12.4 V | Not the cause, but a dirty power ground (pin B) can couple into signal return |
For the standard SAE J1939 9-pin assignments, refer to the specification directly. This table extends it with the forensic data that solved the case — that’s what makes it useful beyond any generic pinout.
Questions the Maintenance Supervisor Asked Me During the Call
After we found the offset, he had plenty of questions. Here are the ones that mattered most.
“I don’t understand—how can less than half a volt knock out half the ECUs on a truck?”
I pointed him to the J1939-11 common-mode spec: the transceiver is allowed to see up to +7 V, so 0.3 V feels safe. But safety margins aren’t flat. When the ABS ECU ground sits 0.3 V above the engine ECU ground, every recessive bit that the engine sends lands 0.3 V higher at the ABS receiver. Add a wet connector and a couple of ohms of frame corrosion, and the recessive level pushes past the receiver’s threshold intermittently. That’s when the controller screams “bus off” and the service manual says “replace ECU.”
“But we measured 60 Ω across the backbone. That’s perfect termination.”
Termination resistance only checks the differential pair, not the ground reference. I showed him the scope trace with CAN_H referenced to its own ground pin, overlaid on the same signal referenced to battery negative. The 0.3 V DC pedestal was obvious. Without that overlay, you see perfect squares and conclude the bus is fine. We later used a dedicated J1939 oscilloscope waveform diagnostics session to train their techs on what to look for beyond the textbook squares.
“So SAE J1939-11 allows 0.5 V max between grounds. Were we still inside the spec?”
Technically, yes—0.31 V is under the 0.5 V absolute limit. But the spec’s limit is a “must-not-exceed,” not a “guaranteed to work” number. We run digital returns below 0.1 V for a reason: once you add load, vibration, and moisture, that 0.31 V becomes 0.42 V, and bit errors stack up.
“What equipment do you actually need to catch this?”
A high-impedance multimeter with a millivolt range and good back-probe leads will get you the static offset. An oscilloscope with isolated channels is better—it shows you the offset drifting in real time as the blower kicks in. Avoid cheap meters that load the circuit.
“Why did replacing the ABS module seem to fix it for a few days?”
Because every time they unplugged and reconnected the ABS connector, the wiping action temporarily scraped through the oxide layer on the ground terminal. The offset dropped below 0.1 V, the bus cleaned up, and they closed the ticket. A week later, vibration and moisture rebuilt the oxide, and the fault returned.
“How do we stop this happening again on the other eleven trucks?”
We added a star washer and corrosion-inhibiting paste to every chassis ground bond point on the backbone. We also rerouted the shield drains so they terminated at one end only, at the engine bulkhead. And we replaced the backbone drops with harnesses that come with a verified ground-path resistance under five milliohms from pin C to the connector shell. After that, the highest offset we logged across the entire fleet was 0.03 V — even with headlamps, blower, and trailer ABS all pulling full current simultaneously.
Engineering Support When You Need It
If you’re staring at a fleet that won’t behave and you suspect a J1939 physical layer problem — ground offset, shield loops, impedance mismatches, or connector corrosion — reach out. We don’t sell off-the-shelf quick fixes. We discuss your network topology, your existing wiring, and whether a customized cable solution can eliminate the root cause before you spend another dollar on modules that aren’t broken. We’ve walked through this exact diagnostic sequence with fleets running refrigerated trailers, concrete mixers, and long-haul sleepers — the voltage values change, but the root physics don’t. If you need to train your crew on catching these invisible shifts, our J1939 ground offset voltage diagnosis guide is a good starting point.
For OEM customization — logo, brand, length, color, AWG, connector keying — you can request specs and engineering drawings through our Contact page:
https://obd-cable.com/contact/
If you need a fast technical chat, message us on WhatsApp:
https://api.whatsapp.com/send/?phone=8617307168662&text=Need+Help%3F+Chat+linda+WhatsAPP&type=phone_number&app_absent=0
A 0.3 volt DC shift can drain nine thousand eight hundred dollars from a fleet. Measuring it takes five minutes. Fixing it takes a wire brush and a star washer. And if the wiring itself is past saving, we can build you something that won’t let it happen again.
