

Estimated reading time: 14 minutes | Field-tested procedures from 20+ years of manufacturing and diagnostic cable engineering
A few weeks ago, a fleet maintenance supervisor I’ve known for years called me from a service bay outside Nashville. He had a 2019 Freightliner Cascadia that refused to communicate with his diagnostic laptop. The scan tool powered up—so pin 16 and ground were alive—but every connection attempt timed out with the same maddening message: “No communication with vehicle.” The truck was due for a DPF regen, and it was hemorrhaging revenue by the hour.
He’d already done the obvious: swapped scan tools, tried different software versions, even borrowed a neighbor’s Autel. Nothing. The dealer was two hours away and quoted $800 just to diagnose the communication failure—parts and repair extra.
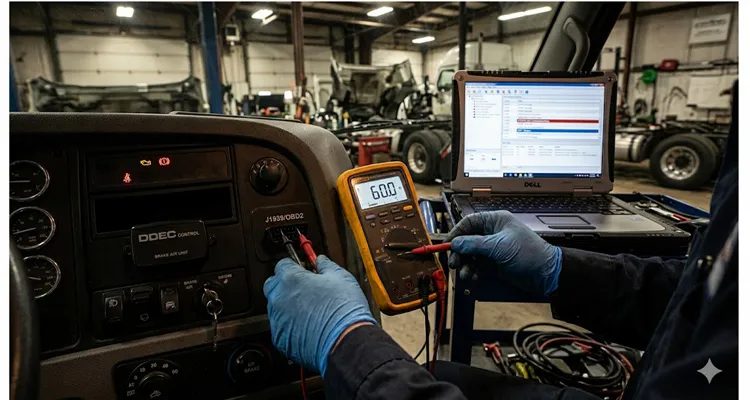
I asked him one question: “What’s the resistance between pins 6 and 14?”
He didn’t know. He hadn’t measured it.
Three minutes later, he texted me: 120 ohms. On a CAN bus that should read roughly 60 ohms with both terminations present. One missing 120-ohm resistor at the other end of the backbone—probably a corroded connector at the aftertreatment ECU—and the entire diagnostic session was dead before it started. The repair cost $47 in parts and about two hours of his own labor tracing the backbone. He never went to the dealer.
This happens constantly. And it’s almost always avoidable.
Why Your Scan Tool Powers Up but Won’t Talk
This is the scenario that generates the most frustrated phone calls to our engineering support desk: The scan tool lights up, the software loads, but the connection to the ECU times out. The technician assumes the tool is defective, the software is outdated, or the vehicle has a “ghost” electrical issue that only the dealer can resolve.
In reality, power and ground at the Data Link Connector (DLC) only prove that pin 16 has battery voltage and pins 4/5 have continuity to ground. That’s about 10% of what’s required for a successful diagnostic session. The remaining 90% involves the physical layer of the vehicle’s communication network—voltages, terminations, and signal integrity that no amount of software updates or scan tool swaps will fix. If you’ve never performed a systematic CAN bus physical layer test, you’re essentially troubleshooting blindfolded.
A DLC is a passive connector. It doesn’t do anything. It simply provides access to the vehicle’s communication buses. If those buses are compromised, your $3,000 scan tool is as useful as a paperweight.
Before you pay a dealer diagnostic fee, before you ship a “defective” cable back to us, before you waste another hour guessing—spend 30 minutes testing the physical layer. Here’s exactly how.
The 30-Minute Physical Layer Test Protocol
This protocol assumes you have a digital multimeter (DMM) with at least 10 MΩ input impedance—a basic Fluke or equivalent will do. You do not need an oscilloscope for this initial triage, though a scope becomes essential if these tests pass but communication remains intermittent.
Test 1: Power and Ground Verification (3 minutes)
The scan tool needs clean, stable power. Voltage drop across corroded pins or undersized wiring can cause the tool’s internal regulator to brown out right in the middle of a diagnostic session. In heavy-duty applications, this drop is insidious; a corroded fuse block can easily introduce enough resistance to starve a scanner, a scenario we cover in depth in our J1939 voltage drop field test guide.
- Pin 16 to Pin 4: Key off, measure DC voltage. You’re looking for battery voltage (≈12.6V). If you see less than 12.0V, you have a voltage drop issue—check the OBD fuse (typically labeled DLC, DIAG, or OBD in the fuse panel).
- Pin 16 to Pin 5: Repeat the measurement. Pin 4 is chassis ground; pin 5 is signal ground. They are often tied together in the harness, but not always. A voltage discrepancy between the two measurements indicates a ground offset problem—a classic sign of a floating signal reference.
- Pin 4 to chassis ground: Measure resistance. Should be under 1 Ω. Anything higher indicates a compromised ground path—often corrosion at a body ground lug.
This test takes three minutes. It eliminates the most basic power delivery failures. Yet I’ve watched technicians spend hours chasing protocol issues when the problem was a corroded fuse contact.
Test 2: CAN Bus Termination Resistance (5 minutes)
This is the highest-value test in the entire protocol. It reveals more about the health of a CAN network than any other single measurement.
With the vehicle powered off (key out, battery connected), measure resistance between:
- Pins 6 and 14 (HS-CAN, 500 kbps, ISO 11898-2)
Don’t expect exactly 60.0 Ω on your meter. You’ll likely see something between 58 Ω and 62 Ω depending on lead resistance and ambient temperature. That’s the signature of two 120 Ω termination resistors doing their job at opposite ends of the backbone. On our factory test fixtures, we simulate exactly this 60Ω load to validate every J1939 cable before it ships. If you need to tap into a heavy-duty backbone for these measurements without stripping wires, a J1939 9-Pin Pigtail Breakout Cable makes the job clean and reversible.
Here’s what different readings mean in the field:
| Meter Reading | What the Bus Is Telling You | Next Step |
| ≈60 Ω (± lead tolerance) | Bus is intact. Both terminators present. | Proceed to voltage tests. |
| 120 Ω (solid) | The “open circuit” signature. One end of the backbone is floating. | Start checking connectors that get road spray. See our notes on J1939 backbone termination and stub length to understand why this kills communication.For a deeper analysis of the financial impact, read how poor termination and stub length mistakes create $4,000/year in phantom faults. |
| < 45 Ω | Too much load. Extra resistance in parallel. | Someone plugged in a GPS tracker or a gateway with its own termination. |
| Near 0 Ω | Copper on copper where it shouldn’t be. | Inspect harness for pinch damage; find the short between CAN_H and CAN_L. |
| O.L. (Over Limit) | Dead bus. No path between the lines. | Verify the ECUs are awake and powered; check backbone continuity. |
On some vehicles with multiple CAN buses, you may also find CAN on pins 3/11 (MS-CAN) or pins 1/9 (varies by manufacturer). The same parallel resistance logic applies to any ISO 11898-2 compliant bus.
Important nuance: Some ECUs use software-configurable termination that is only active when the node is powered. If you measure 120 Ω with the vehicle off, try measuring again with the ignition on (engine off). If the reading drops to roughly 60 Ω, you have a powered termination scheme—that’s normal behavior for that vehicle.
Test 3: CAN Bus Voltage Levels (5 minutes)
With the ignition on (engine off, or engine running depending on what wakes the network), measure DC voltage:
- Pin 6 (CAN_H) to ground (pin 4 or 5): You’re looking for a quiescent state. Pin 6 should sit somewhere north of 2.5V—usually between 2.5V and 3.5V.
- Pin 14 (CAN_L) to ground: Expect between 1.5V and 2.5V.
On an idle bus, both lines settle around 2.5V. When traffic is present, the DMM shows a time-averaged value. A DMM cannot show you the actual bit transitions; for that, you need a scope. But for pass/fail triage, the DMM is sufficient.
Voltage deviations and what they actually mean in a service bay:
| Observation | What’s Likely Happening |
| CAN_H and CAN_L both near 0V | Transceivers aren’t getting power. Check ECU supply fuses. |
| Both lines near battery voltage | A harness has found a 12V source it shouldn’t have. I’ve seen a chafed wire on a Cummins backbone do this and take down the whole powertrain bus. |
| CAN_H ≈ 5V, CAN_L ≈ 4V (little differential) | Transceiver fault or the bus is stuck in a dominant state. |
| CAN_H and CAN_L identical voltage | Shorted CAN_H to CAN_L (confirm this with the resistance test from Test 2). |
| One line at expected voltage, the other at 0V | Single line open or shorted to ground somewhere in the harness. |
If voltages are within range, the transceivers are at least attempting to communicate. The problem may be protocol-level rather than physical—but you’ve now ruled out the most common failure modes.
Test 4: Ground Offset and Noise Check (5 minutes)
This test is often skipped, which is a mistake. A floating ground reference can corrupt CAN differential signals in ways that mimic protocol errors.
- With the engine running, measure AC voltage between pin 4 (chassis ground) and the battery negative terminal. Anything above 50 mV AC indicates excessive ground noise—often from a failing alternator diode or a deteriorated engine ground strap.
- Measure DC voltage between pin 4 and pin 5. These should be at the same potential. More than 0.1V difference indicates a ground loop or compromised signal ground path.
Test 5: Visual Inspection of the DLC and Harness (5 minutes)
I keep a small LED flashlight in my diagnostic kit for exactly this purpose. Shine it into the DLC cavity and look for:
- Spread pins: The J1962 connector uses female terminals. Over time, repeated insertions can spread the contacts, creating intermittent connections. If any pin looks wider than its neighbors, it’s compromised.
- Corrosion or green crust: Especially on pins 4, 5, and 16. Salt-belt vehicles are notorious for this.
- Debris or bent pins: A single bent pin can short adjacent circuits.
- Aftermarket devices: GPS trackers, fleet telematics units, insurance dongles—anything plugged into the DLC or spliced into the harness behind it. These devices can introduce additional termination resistance, draw excessive current, or corrupt bus traffic.
Common Mistakes That Turn a 30-Minute Test Into an $800 Dealer Visit
I see the same mistakes repeated across shops, from independent garages to large fleet maintenance facilities. They’re all avoidable.
Mistake 1: Measuring resistance with the vehicle powered on. This is the fastest way to get meaningless readings. CAN termination is a passive measurement. Key off. Always.
Mistake 2: Using a cheap multimeter with low input impedance. A meter with < 1 MΩ input impedance will load down the circuit and give you false voltage readings. Use a meter with at least 10 MΩ input impedance.
Mistake 3: Assuming “OBD-II” means only pins 6 and 14 matter. The J1962 connector supports at least five different communication protocols. If your vehicle uses K-Line (pin 7) and you’re only testing CAN pins, you’re looking in the wrong place. Know your vehicle’s protocol before you start.
Mistake 4: Ignoring the other CAN buses. Modern vehicles often have multiple CAN networks. If your scan tool communicates with the instrument cluster but not the engine ECU, you may have a gateway issue or a failure on a specific bus segment.
Mistake 5: Blaming the cable without evidence. I understand the impulse—the cable is the variable you just introduced. But a properly manufactured diagnostic cable is a passive interconnect. If it worked yesterday and doesn’t work today, the cable is rarely the culprit. Test the vehicle side first. In fact, J1939 Type1/Type2 misdiagnosis is a classic example where the connector type, not the cable, is the root of the problem.We documented a fleet that spent $5,000 in unnecessary repairs before discovering they were using the wrong DLC type.
When the Physical Layer Tests Pass but Communication Still Fails
If you’ve completed all five tests and everything measures within specification, the problem has moved up the stack. Here’s your escalation path:
- Verify protocol and baud rate. A single node configured for the wrong baud rate will flood the bus with error frames and can trigger bus-off conditions. This is common after ECU replacements or software updates.
- Check for identifier conflicts. If two nodes attempt to transmit with the same CAN ID, arbitration fails repeatedly.
- Measure bus load. A saturated bus (>70–80% utilization) can cause communication timeouts. This often happens when an aftermarket device is spamming the network.
- Isolate nodes. Disconnect ECUs one by one (starting with non-essential modules) until communication is restored. The last module disconnected is the likely culprit.
At this stage, you may need a CAN analyzer or oscilloscope. But the $800 diagnostic fee is still avoidable—you’ve done the heavy lifting and can hand a technician a targeted problem description rather than a vague “it won’t communicate.”
Why This Matters for a Diagnostic Cable (And Why We Build Them Differently)
You can’t fix a bus termination issue with a cable that introduces its own impedance mismatch. That’s why we stopped treating cable building like a commodity operation years ago. The impact of stub length and improper termination is so severe that we’ve documented a case where a simple J1939 termination and stub length mistake cost thousands in phantom faults.
The physical layer tests described above? We run variations of them on every cable assembly before it leaves our facility. Our test fixtures simulate the exact DLC environment—battery voltage on pin 16, grounds on pins 4/5, and a verified 60 Ω load across pins 6/14. In an IATF 16949:2016 environment, you trace potential failures back to the FMEA. We mapped out “Intermittent CAN Communication” as a top-tier risk on our production line years ago. That’s why you won’t find cold solder joints on pin 6 from our facility; the automated test sequence verifies the differential voltage under simulated bus load before the cable ever sees a truck.
The four-step inspection isn’t just a sign-off sheet. It’s a gate that stops a technician from chasing a ghost in the machine because of a weak crimp on pin 14. A broken ground wire inside a molded boot causes the exact same voltage offset as a corroded chassis lug on the vehicle. Knowing the protocol means you don’t waste hours swapping parts when the issue is a 6-inch jumper harness.
If you’re integrating hardware into a 2027 Freightliner or a piece of mining equipment that sees -40°C cold starts, the conversation isn’t about “color options.” It’s about wire insulation that doesn’t turn into rock and connectors that maintain contact pressure after 10,000 insertion cycles. We stock materials for exactly those edge cases—specifying jacket compounds for chemical resistance, AWG sizes for specific voltage drop requirements, and custom pinouts for proprietary gateways—not just the standard PVC and brass you see everywhere else. And when routing is a nightmare, we even engineer solutions like a J1939 90-Degree Right Angle Cable to survive in tight dash panels.
We’ve been building OBD cables, J1939 backbone connectors, and custom harnesses under one roof since 2005. The facility operates under 5S management in a climate-controlled warehouse with full traceability from raw copper to finished assembly. This isn’t marketing language—it’s how you ensure the cable in your hand doesn’t become the next variable in a $800 diagnostic nightmare.
If you’re chasing an intermittent data link issue that’s costing you hours you’ll never get back, or if you’re engineering a diagnostic product that needs reliable physical-layer connectivity across thousands of installations, we’ve probably seen your problem before.
- Need help tracing a bus fault? Reach out through the Contact Page.
- Have a specific OEM integration question? Message us on WhatsApp.
No hard sells, no scripts—just the same troubleshooting conversation I’d have with a technician standing next to me in the bay.
FAQ: Data Link Error Diagnostics
Q1: My scan tool powers on but says “No communication.” Where do I start?
Start with the three-minute power and ground verification (Test 1 above). Then measure termination resistance across pins 6 and 14 (Test 2). These two tests identify roughly 70% of all communication failures.
Q2: I measured 120 Ω across pins 6/14. What does that mean?
One of the two required 120 Ω termination resistors is missing. The CAN backbone has an open circuit—usually a disconnected ECU, a corroded connector, or a broken wire. Trace the backbone harness and verify each ECU is connected and powered.
Q3: I measured 40 Ω or less. Is that a problem?
Yes. You have extra termination loading down the bus. Look for aftermarket devices plugged into the DLC (GPS trackers, insurance dongles, fleet telematics) or a node with internal termination that shouldn’t be active.
Q4: Can I test CAN voltages with a regular multimeter?
Yes, for pass/fail triage. A DMM shows average voltage—expect roughly 2.7V on CAN_H and 2.3V on CAN_L with traffic. It cannot show signal integrity issues. If voltages are correct but communication is intermittent, you need an oscilloscope.
Q5: My vehicle uses K-Line (pin 7), not CAN. Do these tests still apply?
Partially. The power and ground tests (Test 1) apply universally. For K-Line, measure resistance between pin 7 and ground—it should be high impedance, not a dead short. K-Line voltage typically sits at battery voltage when idle and pulls low during communication.
Q6: Should I measure with the engine running or off?
Termination resistance: key off, battery connected. Voltages: ignition on, engine off (or running, depending on what wakes the network). Never measure resistance on a powered bus.
Q7: What if my vehicle has multiple CAN buses on different pins?
Test each bus independently. Pins 6/14 are HS-CAN. Pins 3/11 are often MS-CAN. Pins 1/9 may carry single-wire CAN or manufacturer-specific buses. Check vehicle-specific documentation for exact pin assignments.
Q8: How do I know if my meter is loading down the circuit?
Use a meter with at least 10 MΩ input impedance. Most name-brand meters (Fluke, Keysight) meet this. Cheap meters may have 1 MΩ or less and will pull voltages down artificially.
Q9: The physical layer tests pass, but I still can’t communicate. What now?
Escalate to protocol-level diagnosis: verify baud rate, check for identifier conflicts, measure bus load, and isolate nodes one by one. You may need a CAN analyzer.
Q10: Could the problem be the diagnostic cable itself?
Yes—and the same physical layer tests apply. Test continuity from DLC pins to the scan tool connector. A properly manufactured cable should show < 1 Ω end-to-end on each conductor and > 10 MΩ between adjacent pins. If you’re using a cable that hasn’t been 100% tested on a live simulator, you’re introducing an unknown variable into an already complex diagnostic problem.
This article draws on 20+ years of experience manufacturing diagnostic cables and supporting field technicians through data link failures. For engineering support or OEM customization inquiries, connect with us through the contact page or WhatsApp. No sales scripts—just practical, experience-based answers.
