

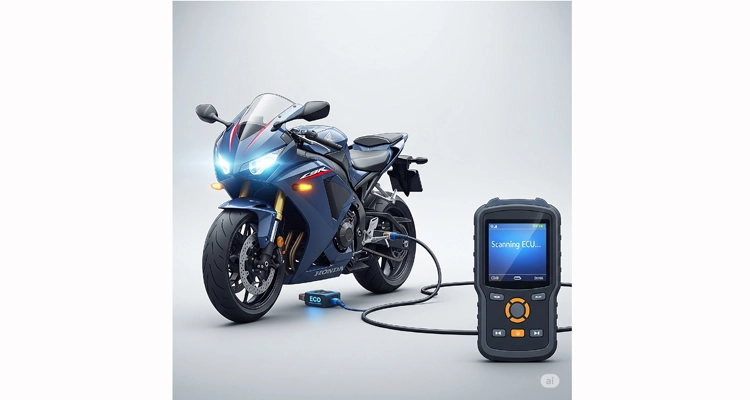
Introduction – Why You Need This Honda Motorcycle ECU Diagnostic Tool
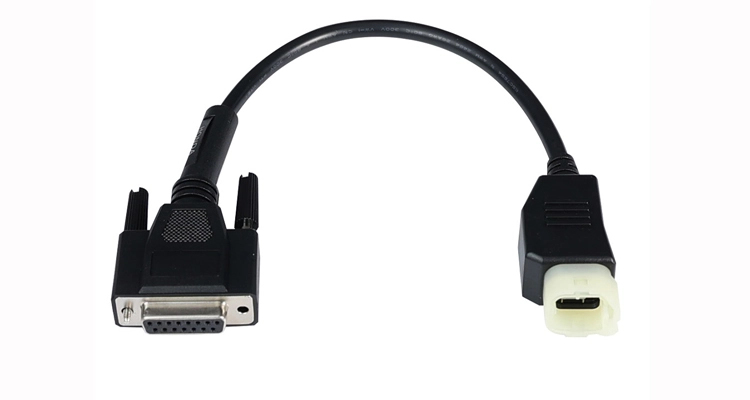
Diagnosing motorcycle ECUs can be challenging without the proper tools. The Honda 4-Pin to DB15 Motorcycle Diagnostic Cable provides a stable connection between your Honda motorcycle and OBD2 scanners, ensuring accurate readings and efficient troubleshooting. Whether you are a professional mechanic or a DIY enthusiast, this cable allows you to identify common ECU issues on GSX-R600, GSX-R750, and GSX-R1000 motorcycles quickly and safely. Using this cable reduces guesswork and saves valuable time during diagnostics.
Learn more on the Honda 4-Pin to DB15 Product Page
Step-by-Step Installation Guide for Honda 4-Pin to DB15 Diagnostic Cable
Step 1 – Locate the 4-Pin Port (Honda Diagnostic Cable Installation Guide)
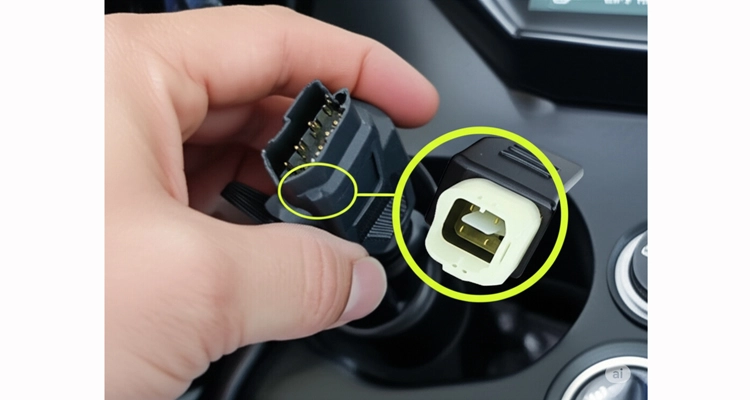
Tip: Confirm the port location, usually under the seat, beside the fuel tank, or inside the front fairing.
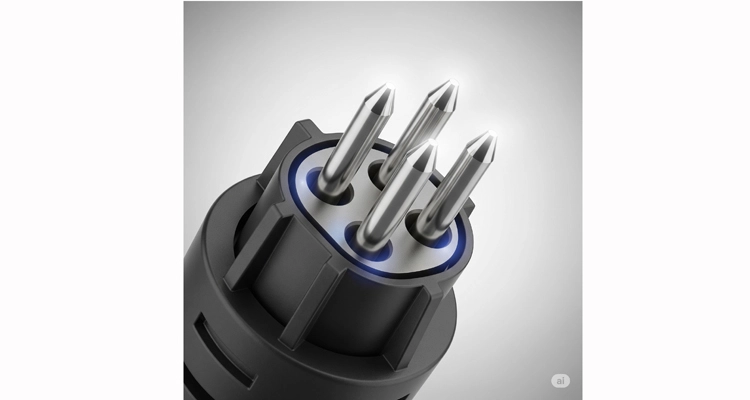
Step 2 – Check Pin Alignment (Honda 4-Pin to DB15 Diagnostic Cable)
Tip: Double-check pin alignment to prevent connector or port damage.
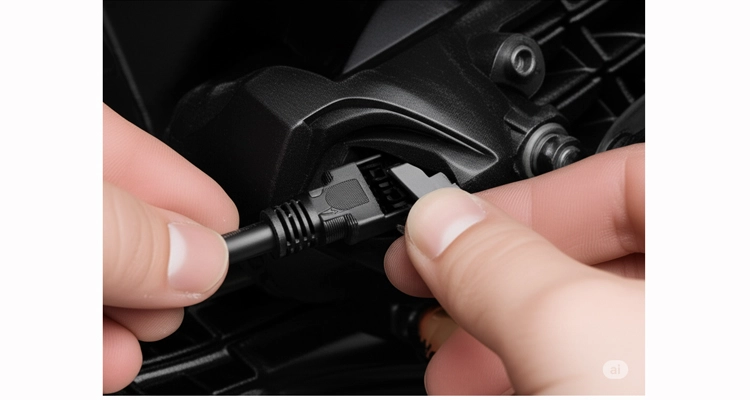
Step 3 – Connect the 4-Pin End for ECU Testing
Tip: Insert the connector steadily until you hear a click.
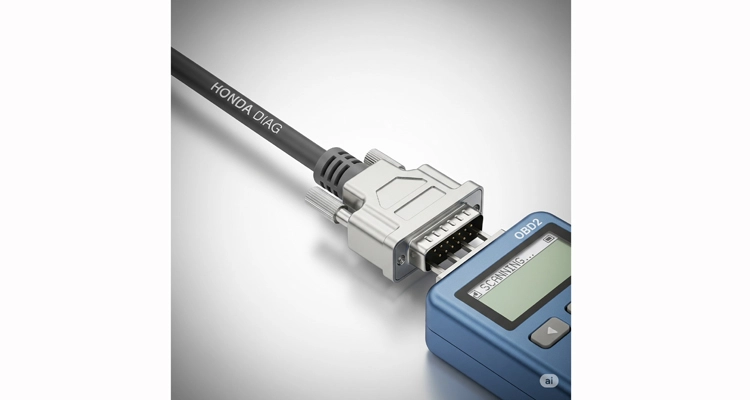
Step 4 – Connect DB15 End to Scanner
Tip: Make sure the DB15 connector is fully seated for stable communication.
Step 5 – Power On & Scan (Honda Motorcycle ECU Troubleshooting Cable)
Tip: Follow your scanner instructions and observe the display to ensure ECU communicates correctly.
Optional Video Demonstration of Honda 4-Pin to DB15 Diagnostic Cable
Full installation demonstration of Honda 4-Pin to DB15 diagnostic cable.
External References
- SAE J1939 Standards Collection – Overview of the J1939 series of standards for vehicle communication and diagnostics.
- SAE J1939-13: Off-Board Diagnostic Connector – Defines the 9-pin Deutsch connector used in heavy-duty vehicle diagnostics.
- SAE J1939 Explained – A Simple Intro (CSS Electronics) – Practical, in-depth tutorial on J1939 protocol and message structure.
- Wikipedia – SAE J1939 – General overview and background of the SAE J1939 protocol family.
Troubleshooting & FAQ
Common Issues
- Scanner not detecting ECU: Ensure connectors are fully seated
- Error codes after connection: Restart the motorcycle and scanner
FAQ
Q: Can I use this cable for non-Honda motorcycles?
A: No, it is specifically designed for Honda motorcycles with 4-Pin diagnostic ports.
Q: How long is the cable?
A: 1.2 meters (approx. 4 feet), suitable for home or workshop use.
Q: Can I clean the connectors?
A: Yes, use a dry cloth or electronic cleaner. Avoid water or corrosive liquids.
Q: Is the cable compatible with aftermarket scanners?
A: Yes, it works with most OBD2 scanners that support 4-Pin DB15 adapters.
Q: Can I connect multiple scanners at the same time?
A: Only one scanner should be connected at a time to avoid communication errors.
Q: Will using this cable damage my motorcycle ECU?
A: No, if the pins are aligned properly and connections are secure, the cable is safe to use.
Q: What should I do if the scanner does not detect the ECU?
A: Ensure both ends are fully seated, check pin alignment, and restart the motorcycle and scanner if necessary.
Q: Is this cable suitable for professional workshops and DIY users?
A: Yes, it is designed for both professional mechanics and DIY enthusiasts for reliable diagnostics.
Compatible Honda Models
| Model | Year Range | Connector Type | Notes |
| GSX-R600 | 2006–2023 | 4-Pin | Standard diagnostic port |
| GSX-R750 | 2005–2023 | 4-Pin | Check pin orientation |
| GSX-R1000 | 2007–2023 | 4-Pin | Plug-and-play compatible |
Benefits of Honda 4-Pin to DB15 Diagnostic Cable for Motorcycle ECU Troubleshooting
- Reliable connection ensures accurate diagnostics
- Durable and long-lasting cable material
- Compatible with Honda motorcycles 4-Pin diagnostic ports
- Reduces troubleshooting time for mechanics and enthusiasts
Learn more on the Honda 4-Pin to DB15 Product Page
Call to Action
Ready to improve your diagnostic workflow? Contact us via:
Conclusion / Final Tip
Using the Honda 4-Pin to DB15 Motorcycle Diagnostic Cable simplifies ECU troubleshooting for GSX-R600, GSX-R750, and GSX-R1000 motorcycles. By following the step-by-step installation guide and observing the troubleshooting tips, you can ensure accurate motorcycle ECU readings and save time during diagnostics. Always double-check pin alignment, secure connections, and refer to your scanner’s instructions for best results.
